Lab 1-3 - TUI Programming with Newt
newt คืออะไร?
Section titled “newt คืออะไร?”newt เป็นไลบรารีภาษา C สำหรับสร้าง Text User Interface (TUI) — คือ UI ที่มีหน้าต่าง ปุ่ม ช่องกรอกข้อความ ฯลฯ แต่ทำงานบน terminal ล้วน ๆ ไม่ต้องมี GUI
newt ถูกพัฒนาโดย Red Hat เพื่อใช้ในโปรแกรมติดตั้ง Red Hat Linux (ตัว installer สีน้ำเงิน ๆ ที่เห็นตอนลง Linux แบบ text mode นั่นแหละ) จุดเด่นคือ เล็ก เรียบง่าย และเขียนตามลำดับได้เหมือนโปรแกรม C ปกติ
ทำไมต้องเรียนในวิชา OS?
Section titled “ทำไมต้องเรียนในวิชา OS?”- newt ทำงานติดกับ terminal โดยตรง — ได้เห็นแนวคิด raw mode, การจัดการ terminal state และ signal (
SIGTSTP) ซึ่งเป็นเรื่องของ OS ตรง ๆ - เป็นภาษา C ล้วน compile ด้วย gcc — ต่อยอดกับงาน systems programming (process, socket) ได้ทันที เช่น เอาไปทำหน้าจอให้ mini project ของเรา
- ง่ายกว่า ncurses มาก — เหมาะกับการเริ่มต้น TUI
จุดสำคัญที่ต้องรู้ก่อนเริ่ม
Section titled “จุดสำคัญที่ต้องรู้ก่อนเริ่ม”newt ไม่ใช่ event-driven เหมือน GUI framework ทั่วไป (GTK, Qt, WinForms) — เราไม่ต้องเขียน event handler แล้วรอให้ระบบเรียก แต่เขียนโค้ดตามลำดับปกติ:
สร้างหน้าต่าง → สร้าง component → รัน form (รอ user กรอก) → อ่านค่า → ไปต่อดังนั้นโปรแกรม command line เดิม ๆ ที่ใช้ printf/scanf สามารถแปลงเป็น newt ได้โดย ไม่ต้องเปลี่ยน control flow เลย
ข้อจำกัดที่ต้องรู้:
- หน้าต่างทำงานเป็น stack — หน้าต่างที่เปิดทีหลังต้องปิดก่อน (ทุกหน้าต่างเป็น modal dialog)
- user สลับไปมาระหว่างหน้าต่างไม่ได้ ใช้ได้เฉพาะหน้าต่างบนสุด
- รับ input จาก keyboard เท่านั้น (ไม่มี mouse)
การติดตั้ง
Section titled “การติดตั้ง”บน Ubuntu / WSL2:
sudo apt updatesudo apt install libnewt-devตรวจสอบว่าติดตั้งสำเร็จ:
ls /usr/include/newt.hการ compile
Section titled “การ compile”ต้อง link ไลบรารีด้วย -lnewt เสมอ:
gcc hello.c -o hello -lnewtโปรแกรมแรก: Hello newt
Section titled “โปรแกรมแรก: Hello newt”ทุกโปรแกรม newt มีโครงเหมือนกัน: เริ่มด้วย newtInit() และจบด้วย newtFinished()
#include <newt.h>#include <unistd.h>   // sleep()
int main(void) {    newtInit();     // เริ่มระบบ newt + สั่ง terminal เข้า raw mode    newtCls();      // เคลียร์หน้าจอ (ไม่บังคับ แต่ทำแล้วสวยกว่า)
    // เขียนข้อความลงบน root window (พื้นหลัง)    newtDrawRootText(0, 0, "COS3105 - Hello newt!");
    // ค่าติดลบ = นับจากขอบอีกด้าน (-1 คือบรรทัด/คอลัมน์สุดท้าย)    newtDrawRootText(-30, -3, "text at bottom-right corner");
    // help line = บรรทัดล่างสุดของจอ, NULL = ใช้ข้อความ default ของ newt    newtPushHelpLine(NULL);
    newtRefresh();  // บังคับให้วาดหน้าจอทันที    sleep(3);
newtFinished(); // คืนสภาพ terminal กลับเป็นปกติ *สำคัญมาก* return 0;}gcc hello.c -o hello -lnewt./hello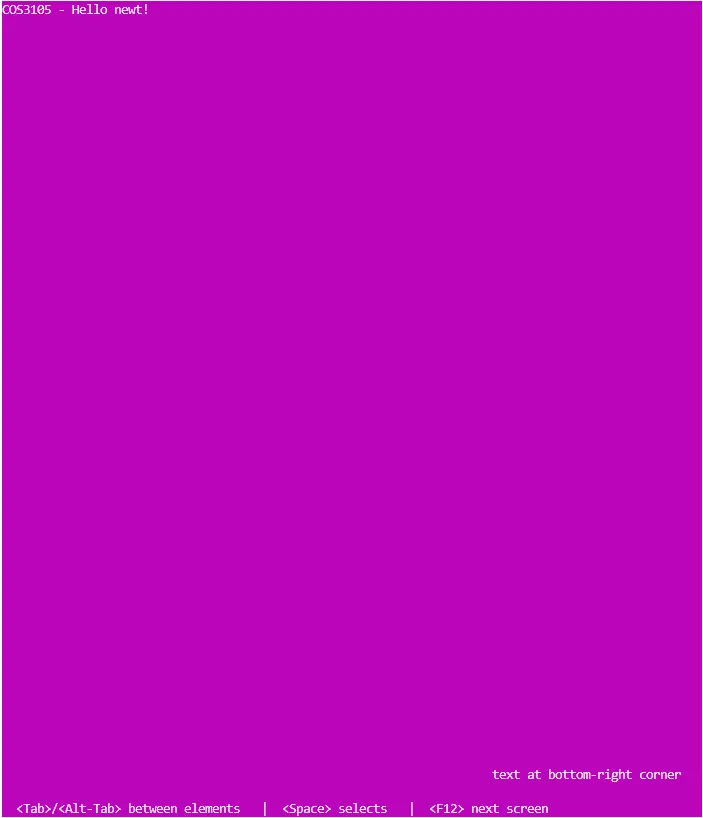
⚠️ ถ้าลืม
newtFinished()— terminal จะค้างอยู่ใน raw mode พิมพ์อะไรก็เพี้ยน ให้พิมพ์คำสั่งresetแล้วกด Enter เพื่อกู้คืน
ฟังก์ชันพื้นฐานที่ใช้บ่อย
Section titled “ฟังก์ชันพื้นฐานที่ใช้บ่อย”| ฟังก์ชัน | หน้าที่ |
|---|---|
newtInit() |
เริ่มระบบ newt (เรียกก่อนเสมอ) |
newtCls() |
เคลียร์หน้าจอ |
newtFinished() |
คืนสภาพ terminal (เรียกก่อนจบโปรแกรมเสมอ) |
newtRefresh() |
บังคับวาดหน้าจอทันที (ปกติ newt วาดเฉพาะตอนรอ input) |
newtWaitForKey() |
หยุดรอจนกว่าจะกดปุ่มอะไรก็ได้ |
newtBell() |
ส่งเสียง beep |
newtDrawRootText(left, top, text) |
เขียนข้อความบนพื้นหลัง |
newtPushHelpLine(text) / newtPopHelpLine() |
จัดการบรรทัดช่วยเหลือด้านล่าง (เป็น stack) |
💡 สังเกต convention ของ newt: พิกัดส่งเป็น (left, top) คือ x มาก่อน y เสมอ และขนาดส่งเป็น (width, height)
หน้าต่าง (Windows)
Section titled “หน้าต่าง (Windows)”มี 2 วิธีเปิดหน้าต่าง:
// เปิดหน้าต่างกลางจอint newtCenteredWindow(int width, int height, const char *title);
// เปิดหน้าต่างระบุตำแหน่งเองint newtOpenWindow(int left, int top, int width, int height, const char *title);
ปิดหน้าต่าง (ปิดได้เฉพาะหน้าต่างบนสุด — จำได้ไหม? มันเป็น stack):
void newtPopWindow(void);Components และ Forms
Section titled “Components และ Forms”ทุกอย่างที่แสดงบนจอใน newt เรียกว่า component (ปุ่ม, label, ช่องกรอก, checkbox, listbox ฯลฯ) ทุก component มี type เดียวกันหมดคือ newtComponent
Form คือ component พิเศษที่ทำหน้าที่ “รวบรวม” component อื่นเข้าด้วยกัน ขั้นตอนมาตรฐานคือ:
newtComponent form, b1;
form = newtForm(NULL, NULL, 0);            // 1. สร้าง form (3 พารามิเตอร์นี้ให้ใส่แบบนี้ไปก่อน)b1 = newtButton(10, 1, "Ok");              // 2. สร้าง componentnewtFormAddComponents(form, b1, NULL);     // 3. เอา component ใส่ form (ปิดท้ายด้วย NULL)
// หรือ ถ้ามี component อื่นๆ เช่น b2, b3, b4newtFormAddComponent(form, b2);newtFormAddComponent(form, b3);newtFormAddComponent(form, b4);

newtRunForm(form);                         // 4. รัน form — โปรแกรมหยุดรอ user ตรงนี้newtFormDestroy(form);                     // 5. คืน memory ของ form + ทุก component ข้างใน
newtRunForm() จะคืน control กลับมาเมื่อ user กดปุ่ม (button) หรือกด F12 (hot key default = ปุ่ม Ok)
ปุ่ม (Buttons)
Section titled “ปุ่ม (Buttons)”มี 2 แบบ: ปุ่มเต็ม (สวยแต่กินที่ 3 บรรทัด) กับปุ่ม compact (บรรทัดเดียว)
newtComponent newtButton(int left, int top, const char *text);newtComponent newtCompactButton(int left, int top, const char *text);ตัวอย่างเต็ม: หน้าต่าง + ปุ่ม
Section titled “ตัวอย่างเต็ม: หน้าต่าง + ปุ่ม”#include <newt.h>#include <stdlib.h> // NULL
int main(void) { newtComponent form, b1, b2;
newtInit(); newtCls();
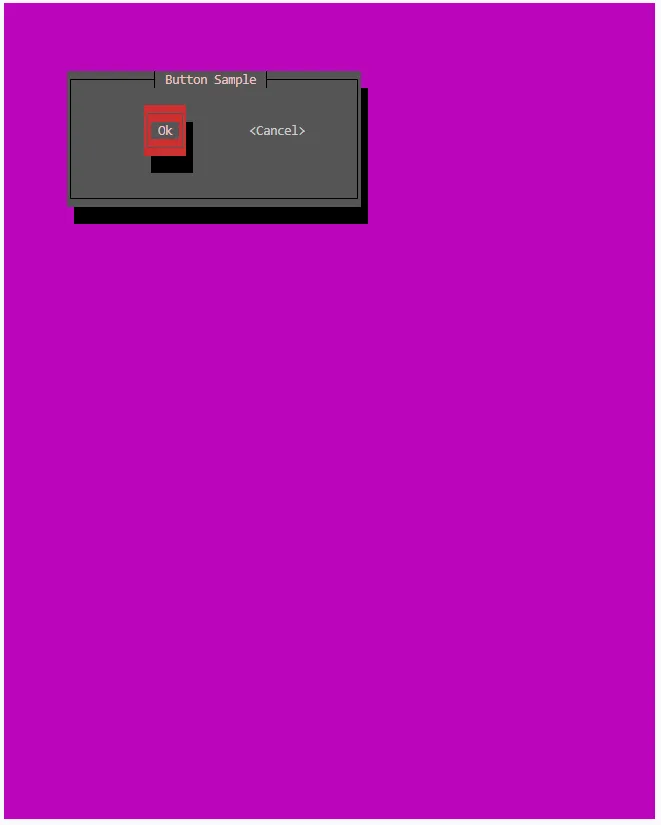
newtOpenWindow(10, 5, 40, 6, "Button Sample");
b1 = newtButton(10, 1, "Ok"); b2 = newtCompactButton(24, 2, "Cancel");
form = newtForm(NULL, NULL, 0); newtFormAddComponents(form, b1, b2, NULL);
newtRunForm(form); // กด Tab สลับปุ่ม, Enter/Space เลือก
newtFormDestroy(form); newtFinished(); return 0;}ลองรันแล้วกด Tab เพื่อสลับ focus ระหว่างปุ่ม
Label และ Entry Box
Section titled “Label และ Entry Box”- Label = ข้อความนิ่ง ๆ user แก้ไม่ได้
- Entry box = ช่องให้ user พิมพ์ข้อความ
newtComponent newtLabel(int left, int top, const char *text);
newtComponent newtEntry(int left, int top, const char *initialValue,                        int width, const char **resultPtr, int flags);char *newtEntryGetValue(newtComponent co);
📌 เอกสารเก่า ๆ เขียน
resultPtrเป็นchar **แต่ newt เวอร์ชันปัจจุบัน (0.52.x บน Ubuntu) ใช้const char **— ถ้าประกาศเป็นchar *จะโดน warning-Wincompatible-pointer-types
flags ของ entry ที่ใช้บ่อย:
| Flag | ความหมาย |
|---|---|
NEWT_FLAG_SCROLL |
พิมพ์ยาวเกินความกว้างช่องได้ (ช่องจะ scroll) |
NEWT_FLAG_HIDDEN |
ซ่อนข้อความที่พิมพ์ (เหมาะกับ password) |
NEWT_FLAG_RETURNEXIT |
กด Enter ในช่องนี้แล้ว form จบทันที |
ตัวอย่าง: รับชื่อจาก user
Section titled “ตัวอย่าง: รับชื่อจาก user”#include <newt.h>#include <stdio.h>
int main(void) { newtComponent form, label, entry, button; const char *entryValue; // ต้องเป็น const char * (ดูหมายเหตุด้านบน)
newtInit(); newtCls();
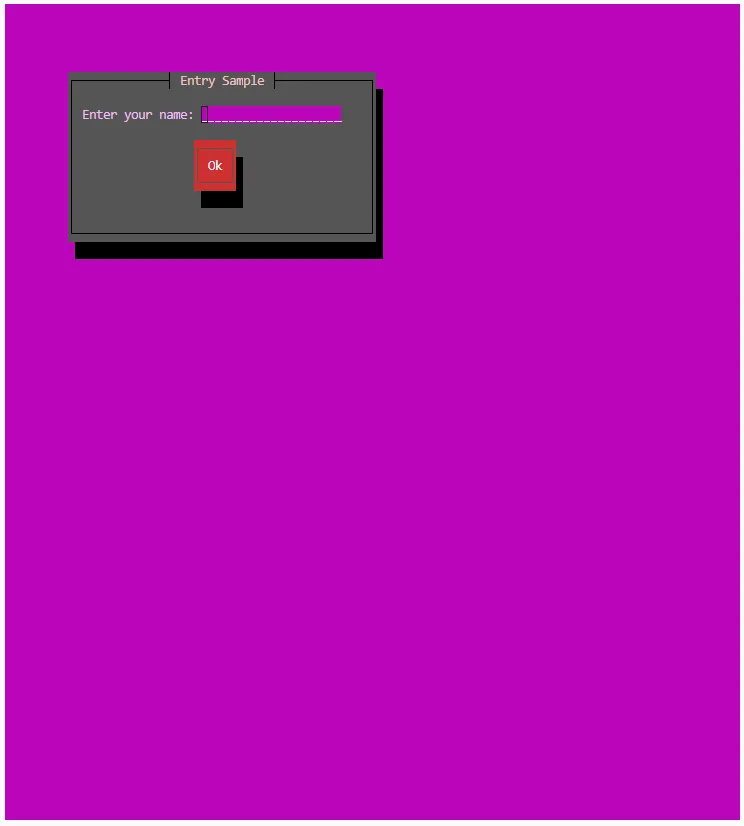
newtOpenWindow(10, 5, 42, 8, "Entry Sample");
label = newtLabel(1, 1, "Enter your name:"); entry = newtEntry(18, 1, "", 20, &entryValue, NEWT_FLAG_SCROLL | NEWT_FLAG_RETURNEXIT); button = newtButton(17, 3, "Ok");
form = newtForm(NULL, NULL, 0); newtFormAddComponents(form, label, entry, button, NULL);
newtRunForm(form); newtFinished();
printf("Hello, %s!\n", entryValue);
/* ต้องใช้ค่า entryValue ให้เสร็จก่อนค่อย destroy form เพราะ newtFormDestroy จะ free memory ของ string นี้ด้วย */ newtFormDestroy(form); return 0;}⚠️ กับดักสำคัญ: pointer ที่ได้จาก
resultPtrหรือnewtEntryGetValue()ชี้ไปยัง memory ภายในของ newt — เมื่อเรียกnewtFormDestroy()แล้ว pointer นั้นจะใช้ไม่ได้ทันที (dangling pointer!) ถ้าจะเก็บค่าไว้ใช้ต่อ ให้strdup()ก่อน destroy
Checkbox และ Radio Button
Section titled “Checkbox และ Radio Button”Checkbox
Section titled “Checkbox”กด Space เพื่อสลับสถานะ ค่า default คือ ' ' (ไม่เลือก) กับ '*' (เลือก)
newtComponent newtCheckbox(int left, int top, const char *text, char defValue, const char *seq, char *result);char newtCheckboxGetValue(newtComponent co);Radio Button
Section titled “Radio Button”เลือกได้ทีละ 1 ตัวในกลุ่ม — การจัดกลุ่มใช้พารามิเตอร์ prevButton: ตัวแรกใส่ NULL ตัวถัดไปใส่ radio button ก่อนหน้า
newtComponent newtRadiobutton(int left, int top, const char *text, int isDefault, newtComponent prevButton);newtComponent newtRadioGetCurrent(newtComponent setMember);ตัวอย่าง
Section titled “ตัวอย่าง”#include <newt.h>#include <stdio.h>
int main(void) { newtComponent form, checkbox, rb[3], button; char cbValue; int i, picked = -1;
newtInit(); newtCls();
newtOpenWindow(10, 3, 40, 11, "Checkbox & Radio");
checkbox = newtCheckbox(1, 1, "Enable verbose mode", ' ', NULL, &cbValue);
rb[0] = newtRadiobutton(1, 3, "Round Robin", 1, NULL); // ตัวแรก = NULL rb[1] = newtRadiobutton(1, 4, "FCFS", 0, rb[0]); // ชี้ตัวก่อนหน้า rb[2] = newtRadiobutton(1, 5, "Priority", 0, rb[1]);
button = newtButton(15, 7, "Ok");
form = newtForm(NULL, NULL, 0); newtFormAddComponent(form, checkbox); for (i = 0; i < 3; i++) newtFormAddComponent(form, rb[i]); newtFormAddComponent(form, button);
newtRunForm(form); newtFinished();
/* หาว่า radio ตัวไหนถูกเลือก — ต้องทำก่อน destroy form */ for (i = 0; i < 3; i++) if (newtRadioGetCurrent(rb[0]) == rb[i]) picked = i;
newtFormDestroy(form);
printf("scheduler picked: %d\n", picked); printf("verbose: %s\n", cbValue == '*' ? "on" : "off"); return 0;}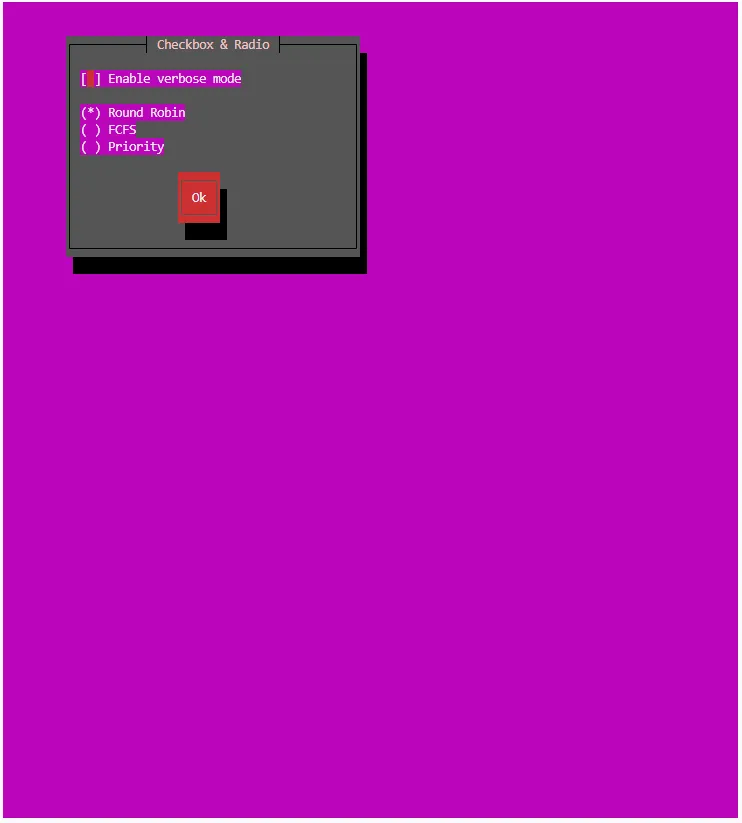
Scale (Progress Bar)
Section titled “Scale (Progress Bar)”เหมาะกับงาน OS มาก เช่น แสดงความคืบหน้าตอน copy ไฟล์ หรือรอ process ทำงาน
newtComponent newtScale(int left, int top, int width, long long fullValue);void newtScaleSet(newtComponent co, unsigned long long amount);fullValue คือค่าที่ถือว่า “เต็ม 100%” เช่น ขนาดไฟล์เป็น byte แล้วเรียก newtScaleSet() อัปเดตเรื่อย ๆ ด้วยจำนวน byte ที่ copy ไปแล้ว
ตัวอย่าง: progress bar จำลอง
Section titled “ตัวอย่าง: progress bar จำลอง”#include <newt.h>#include <unistd.h>
int main(void) { newtComponent form, scale, label; int i;
newtInit(); newtCls();
newtCenteredWindow(40, 5, "Working...");
label = newtLabel(1, 1, "Copying file:"); scale = newtScale(1, 3, 36, 100); // เต็มที่ 100
form = newtForm(NULL, NULL, 0); newtFormAddComponents(form, label, scale, NULL); newtDrawForm(form); // วาด form โดยไม่รอ input
for (i = 0; i <= 100; i += 5) { newtScaleSet(scale, i); newtRefresh(); // ต้อง refresh เอง เพราะไม่ได้รอ input usleep(100000); // 0.1 วินาที }
newtFormDestroy(form); newtFinished(); return 0;}สังเกตว่าตัวอย่างนี้ใช้ newtDrawForm() + newtRefresh() แทน newtRunForm() — เพราะเราไม่ได้รอ input จาก user แต่ต้องการอัปเดตหน้าจอเอง (จำได้ไหมว่า S-Lang จะวาดจอเฉพาะตอนรอ input เท่านั้น)
Textbox
Section titled “Textbox”ใช้แสดงข้อความยาว ๆ พร้อมตัดบรรทัดอัตโนมัติ
newtComponent newtTextbox(int left, int top, int width, int height, int flags);void newtTextboxSetText(newtComponent co, const char *text);
// เวอร์ชันสะดวก: reflow (จัดบรรทัดให้สวย) + สร้าง textbox ในคำสั่งเดียวnewtComponent newtTextboxReflowed(int left, int top, char *text, int width,                                  int flexDown, int flexUp, int flags);int newtTextboxGetNumLines(newtComponent co);
ตัวอย่าง: Textbox มี scrollbar
Section titled “ตัวอย่าง: Textbox มี scrollbar”#include <newt.h>#include <stdlib.h>
int main(void) { // 1. เริ่มต้นระบบ Newt newtInit(); newtCls();
// กำหนดข้อความยาวๆ สำหรับแสดงผล const char *long_text = "Welcome to the Newt Textbox demo. Newt is a programming library for text-mode user interfaces. " "It is based on the slang library. This specific component is a Textbox, which is incredibly useful " "for displaying long paragraphs of text, readmes, licenses, or logs in a terminal window. " "Notice how the text wraps dynamically based on the width provided, and how the scrollbar appears " "on the right when the text exceeds the component's visible height.";
// 2. สร้าง Form หลัก newtComponent form = newtForm(NULL, NULL, 0);
// 3. สร้าง Textbox แบบธรรมดา (ระบุกว้าง 50 สูง 6 ตัวอักษร) // ใช้ธง WRAP (ตัดบรรทัด) และ SCROLL (มีแถบเลื่อนด้านข้าง) newtComponent label1 = newtLabel(2, 1, "=== Standard Textbox (with Scrollbar) ==="); newtComponent textbox1 = newtTextbox(2, 2, 50, 6, NEWT_FLAG_WRAP | NEWT_FLAG_SCROLL); newtTextboxSetText(textbox1, long_text);
// 4. สร้าง Textbox แบบ Reflowed (จัดย่อหน้าและคำนวณความสูงให้อัตโนมัติ) newtComponent label2 = newtLabel(2, 9, "=== Reflowed Textbox (Auto-height) ===");
// newtTextboxReflowed จะรับข้อความธรรมดาแล้วแปลงการจัดรูปเล่มให้พอดีกับความกว้าง // flexDown และ flexUp ตั้งเป็น 0 คือไม่ยืดหยุ่นเกินความจำเป็น newtComponent textbox2 = newtTextboxReflowed(2, 10, (char *)long_text, 50, 0, 0, NEWT_FLAG_WRAP);
// 5. สร้างปุ่ม OK เพื่อกดปิดโปรแกรม newtComponent button = newtButton(22, 16, "OK");
// 6. เพิ่ม Component ทั้งหมดเข้าไปใน Form newtFormAddComponents(form, label1, textbox1, label2, textbox2, button, NULL);
// 7. รัน Form และรอจนกว่าผู้ใช้จะกดปุ่ม OK หรือปุ่ม Enter newtRunForm(form);
// 8. คืนหน่วยความจำและปิดหน้าจอระบบ Newt newtFormDestroy(form); newtFinished();
return 0;}flags: NEWT_FLAG_WRAP (ตัดบรรทัดอัตโนมัติ), NEWT_FLAG_SCROLL (เลื่อนดูได้ — จะกว้างขึ้น 2 ตัวอักษรเพราะมี scrollbar)
Listbox
Section titled “Listbox”component ที่ซับซ้อนที่สุดของ newt — แสดงรายการให้ user เลือก
แต่ละรายการใน listbox เป็นคู่ (text, key):
- text = ข้อความที่แสดง
- key =
void *อะไรก็ได้ที่ใช้ระบุรายการนั้น (ส่วนใหญ่ใช้ int แปลงเป็น pointer หรือ pointer ไปยัง struct)
newtComponent newtListbox(int left, int top, int height, int flags);int newtListboxAppendEntry(newtComponent co, const char *text, const void *data);void *newtListboxGetCurrent(newtComponent co);flags ที่ใช้บ่อย: NEWT_FLAG_SCROLL, NEWT_FLAG_BORDER, NEWT_FLAG_RETURNEXIT, NEWT_FLAG_MULTIPLE (เลือกหลายรายการ)
ตัวอย่าง: เมนูเลือกคำสั่ง
Section titled “ตัวอย่าง: เมนูเลือกคำสั่ง”#include <newt.h>#include <stdio.h>#include <stdint.h>
int main(void) { newtComponent form, list, button; intptr_t choice;
newtInit(); newtCls();
newtCenteredWindow(30, 12, "Main Menu");
list = newtListbox(1, 1, 6, NEWT_FLAG_BORDER | NEWT_FLAG_RETURNEXIT); newtListboxAppendEntry(list, "Show processes", (void *) 1); newtListboxAppendEntry(list, "Show memory", (void *) 2); newtListboxAppendEntry(list, "Show disk usage", (void *) 3); newtListboxAppendEntry(list, "Exit", (void *) 4);
button = newtButton(10, 8, "Ok");
form = newtForm(NULL, NULL, 0); newtFormAddComponents(form, list, button, NULL);
newtRunForm(form);
choice = (intptr_t) newtListboxGetCurrent(list);
newtFormDestroy(form); newtFinished();
printf("You picked menu item: %ld\n", (long) choice); return 0;}
สรุป Pattern มาตรฐานของโปรแกรม newt
Section titled “สรุป Pattern มาตรฐานของโปรแกรม newt”#include <newt.h>
int main(void) { newtInit(); newtCls();
/* --- ทำซ้ำได้เรื่อย ๆ --- */ newtCenteredWindow(w, h, "title"); // 1. เปิดหน้าต่าง
newtComponent form = newtForm(NULL, NULL, 0); // 2. สร้าง component ต่าง ๆ แล้ว add เข้า form newtFormAddComponents(form, ..., NULL);
newtRunForm(form); // 3. รอ user
// 4. อ่านค่าจาก component *ก่อน* destroy!
newtFormDestroy(form); // 5. คืน memory newtPopWindow(); // 6. ปิดหน้าต่าง /* ------------------------ */
newtFinished(); return 0;}ข้อควรระวัง 3 อันดับแรก:
- ลืม
newtFinished()→ terminal พัง (แก้ด้วยคำสั่งreset) - อ่านค่า entry/radio หลัง
newtFormDestroy()→ dangling pointer / ค่าขยะ - ปิดหน้าต่างไม่เรียงตาม stack → หน้าจอวาดผิด
อ้างอิง
Section titled “อ้างอิง”- Erik Troan, Writing Programs Using newt, v0.31 (2003)
- man pages:
man newt(ถ้าติดตั้งlibnewt-devแล้ว ดู header ได้ที่/usr/include/newt.h) - newt ทำงานบนไลบรารี S-Lang ของ John E. Davis (จัดการการวาดหน้าจอระดับล่าง)